Preparing Projected Digital Images (PDI) for competitions
The Quick Guide
1. Resize your image so that its width is 1600 pixels or less, and its height 1200 or less.
2. Make sure that your image is in the sRGB colour space.
3. Save your image as a .jpg file.
4. Make sure the image filename is the title you want to use. Remove any sequence numbers or other information the camera or editing software might have used in the filename, as this will appear on screen for the judge to see. See below for more details.
File Names for Club PDI Competitions
Make sure that the filename of each image is its title. If necessary, right-click on the file name of an image, select ‘Rename’, and enter the title of the image.
Filenames must conform to the usual Windows conventions. Avoid punctuation marks and special symbols. Upper and lower case letters and digits are OK, along with space, underline, hyphen, single-quotes, exclamation marks and parentheses. Note particularly that question mark, period and comma are not allowed. The file name should not be more than 60 characters in length. The files must have the .jpg extension. Remember, the filename is the title the judge will see. It is advisable to have a simple, easy to read and concise filename for the title.
Mac OSX users need to be particularly careful to follow these Windows conventions. A file with a ? in the filename WILL NOT appear on Windows computers.
Examples of typical filenames are:
1. Sleepy Head.jpg
2. Salisbury – South Isle.jpg
3. HMS Victory – Detail.jpg
4. Dawn at Martin Mere.jpg
5. ‘Missed It!’.jpg
Resizing images for Digital Projection (PDI)
To resize an image in most versions of Photoshop we can use Image> Image Size or Resize Image. Please note the names of commands vary between versions of Photoshop.
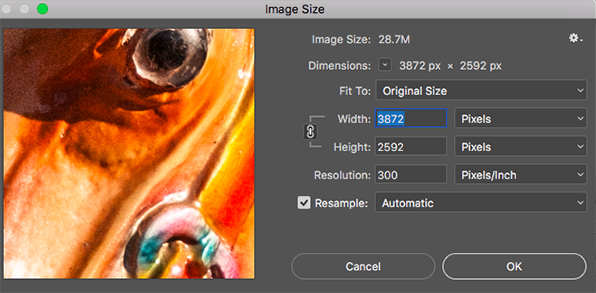
The screen shot above shows a typical Image Size dialog box in Photoshop. Start by checking the Resample Image box is set to automatic from the drop down menu. At the top we have the actual dimensions of the image in pixels. If necessary the units can be changed to pixels using the scroll down menus alongside. Note that the lock that links the width and height numbers is set You should check this for the resizing process to work correctly.
If you wish the sizes not to be linked then instead of selecting Image> Canvas Size. With this method you may crop some of your image away to make it wide or tall.
The resolution can be set at 72 or 96 pixels per inch, which displays the image at about normal size when viewed in Photoshop at 100% on your monitor.
The best way is to simply try some numbers, have a go.
The image frame on our projector is 1600 pixels wide and 1200 pixels high. Not all projectors are the same; if you are preparing your image to be shown on a different projector, you should find out the size of its image frame.
Just type in 1600 in the Width box, and the number in the Height box will change to keep the same proportions. If the height figure is 1200 or less then your resized image will fit within the frame. If the figure in the Height box comes out at more than 1200 pixels, then type 1200 in the Height box, and the figure in the Width box will reduce to less than 1600 pixels, to maintain the same image proportions.
Once you have a satisfactory combination with the width less than or equal to the 1600 and the height less than or equal to 1200, click the OK button and then save your new image.
Alternatively: use the Crop command in Photoshop
A different approach is to crop your image in Photoshop before you start to manipulate it, so that it suits the aspect ratio of the projector. Our projector has an image aspect ratio of 8 wide x 5 high. Select the crop tool. Above your image, at the top of the screen, you’ll see two boxes labelled Width and Height. Just enter 8 in the width box and 5 in the Height box (you don’t need to put any units of measure – you are setting the proportions, not the size). This ensures that after you have finished preparing your image it will have the right proportions to fill the frame when it is projected. But you must not feel constrained by the aspect ratio – if your image demands a letterbox format it will display perfectly well, but there will be some black space above and below it.
Check and Save
Remember that the width must be 1600 pixels or less and the height must be 1200 pixels or less. Once you have a satisfactory combination of height and width you should click OK.
Save a copy as a maximum quality JPG. Note that Photoshop (.psd) documents are NOT suitable for projection.